Something Neos VI – The layouts they are a changin’
Offering customers alternative layouts
osThe times they change themselves as Bob Dillan knew, but for templates in NEOS we have to turn some screws to have the magic of alternative page layouts going.
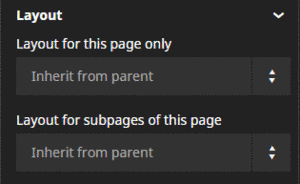
You might already have noticed, that when logged in, there is a “Layout” section in the inspector.
The default value selected is “Inherit from parent” – but what we would like to do is create a new option that can be chosen there.
As always when editing options for the inspector we have to configure the NodeType – in this case: the “Page” NodeType.
The TYPO3.Neos.NodeTypes package is usually included by default in our side after the installation – so we can take a look at: ./Packages/Application/TYPO3.Neos.NodeTypes/Configuration/NodeTypes.Documents.yaml for a reference.
The part of the NodeType definition we want to take a closer look at is:
inspector:
   group: 'layout'
   editor: 'TYPO3.Neos/Inspector/Editors/SelectBoxEditor'
   editorOptions:
      placeholder: 'Inherit from parent'
         values:
            '':
               label: ''
We can learn that the editor is obviously a SelectBoxEditor and that there is currently only an empty value available (we just use “Inherit from parent” on all pages and by default the TS2 “page” object is rendered.)

Multiple NodeTypes.yaml files are aggregated and evaluated from all sites/packages where they are defined – therefore we can extend the page NodeType definition in our own NodeTypes.yaml.
(e.g: ./Packages/Sites/Vendor.Site/Configuration/NodeTypes.yaml)
'TYPO3.Neos.NodeTypes:Page':
  properties:
    layout:
      ui:
        inspector:
          editorOptions:
            values:
              'default':
                label: 'Default'
              'landingPage':
                label: 'Template B'
Here we add two new options – “default” and “landingPage” with according labels.
To make sure everything is in order I recommend checking the NodeType definition via flow command in the shell before checking the inspector for the changes.
./flow configuration:validate --type NodeTypes
Checking the inspector on our page now, we should already be able to see the options in the dropdown inside the layout section of the inspector. (Don’t select it yet – we are missing a TS2 mapping still)
Now it is time to provide the according TS2 objects for the templates. For simplicities sake I’ll assume you already have a fully fletched out “page” object.
default < page
# Use an alternative template if the backend layout "TemplateB" is chosen
landingPage < page
landingPage.body{
    templatePath = 'resource://Vendor.Site/Private/Templates/Page/AlternateLayout.html'
}
The “default” object would therefore display exactly the same as the “page” object, for the “landingPage” object we assigned a different Fluid template (I’ll leave fletching out this different template to your imagination – for testing purposes you could include just a h1 with “Alternative Template” – don’t forget to put this inside one of the used sections though otherwise it won’t get displayed)
The more things change – the more they stay the same
As you might have noticed – we didn’t change anything in the ChildNodes part of the YAML file – therefore you are “stuck” with the same nodes in your alternative template.
The obvious solutions to this problem are:
- A customer that is aware of the solution and does not put content inside the nodes on pages where they are not used (even if content was put there it would not be a problem – the content would just not be displayed in templates that don’t render the node in their fluid template)
- Templates that use exactly the same ChildNodes with different layouts
If one of those two scenarios is acceptable for you and your customer – you found a quick and very easy way for implementing different layouts this way.
If you realized what you really need is a bunch of different childnodes you might be interested in creating a whole new page type – which we will take a look at in Article VII.
comments
No comments yet. Be the first to comment on this!

